Welcome to the first week of our Woodland Valley Throw crochet-along! This week, we’ll be diving into the heart of our project: the log cabin center motifs. Inspired by the classic quilting technique, these squares will form the foundation of our cozy throw.
A Brief History of Log Cabin Squares
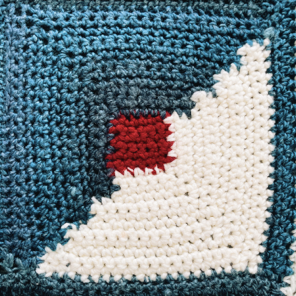
Before we get started, let’s take a quick trip back in time. The log cabin quilt block is a timeless design with roots dating back to the early 19th century. It’s believed to have originated in the American frontier, where settlers used the block to create warm and practical quilts. The name “log cabin” reflects the block’s resemblance to the structure. It features alternating squares of light and dark fabric.
The Red Center: A Symbol of Home and Hearth
In many traditional log cabin quilts, the center square is often red. This color has long been linked to warmth, comfort, and home. It’s a fitting choice for a blanket that’s designed to give both physical and emotional warmth.
Helpful Resources:
- Paid pattern: Get the Pattern HERE
- Paid kit: Get the Kit HERE
Let’s Get Crocheting!
Part 1: The Log Cabin Center
We’ll start by creating four log cabin center squares. These squares are made by crocheting a small red center square and then adding layers of color around it. Here’s a breakdown of the steps involved:
- Create the red center: Crochet a small red square using single crochet stitches.
- Add the first round: Crochet a round of color A around the red center.
- Add the second round: Crochet a round of color B around the first round.
- Continue adding rounds: Repeat steps 2 and 3 to create extra rounds, alternating colors.
A Deeper Dive into the Pattern
Working in the Side of Rows: One unique aspect of the log cabin block is our method. We work into the sides of earlier rows. This is what gives the work it’s unique structure. When you see in the instructions to ‘work in the side of the next XX rows’, you just turn your work 90 degrees and crochet over the single crochet stitch that’ll be sideways! Easy!
Changing Colors: Changing colors in crochet can be a bit tricky, especially when you’re working in the round. Here’s a tip: for this block, fasten off colors after each section. Then, join your new color in the same stitch. This will create a clean transition between colors.
Helpful Tutorials
If you need some visual aids, here are a few basic tutorials that can help you with the techniques we’ll be using:

Remember: Crocheting can be a bit like learning a new language. It takes time and practice to get comfortable with the techniques. Don’t be afraid to make mistakes and don’t hesitate to ask for help if you need it.
Next week, we’ll dive into the border design for our throw. Stay tuned for more crochet fun! Make sure to use the hashtag #woodlandvalleythrow on Instagram so I can see your progress!
Until next week!
Rohn


3 responses
Hello! I received my kit yesterday in the mail (just in time!! 🎉). I was excited to get started and all but the very first step is the red center. There was no red yarn included in the kit. It wasn’t on the packing slip either (so it wasn’t just missing). I thought the kit would have all the yarn I needed to do the blanket. Are we supposed to buy our own separately? I was disappointed to not be able to start yesterday. I’m still excited to get started, just a bit confused.
Thanks! Kris Walters
I bought the kit & I cannot find the video for the CAL anywhere
Hello Rohn!
My note is off-topic (the log cabin is quite lovely though. All of your work is !) so my apologies for posting this question here. I don’t do facebook etc, to contact you the link for emails doesn’t work.
I was hoping to purchase a copy of:
The Heritage Collection vol. 1
Is there a way to purchase it?
Thank you!
Caroline L.
Idaho, USA